Messing around with some sensors
Tech Struggles
Sometimes you learn just a little too late how dumb you are. That’s an experience I had with the Arduino Nano 33 IOT. A useful device for the galaxy-brained among us. It has wifi, bluetooth, a bunch of logical serial ports (which is an important feature!), and it even protects you from your own stupidity.
My trouble started when I decided to grow some mushrooms. North Spore sells fruiting blocks that are very nice. Mushrooms respirate CO2 and absorb O2 and require a special environment, so obviously this hobby was never going to be about mushrooms, it was going to be about detection and measurement of environmental conditions. I already have a desktop CO2 sensor, so I picked up a Luminox 0-25% O2 sensor from gaslab to play with. Plugged it into my Ardunio and that’s where the trouble started.
The first mistake I made was mixing up the power (+5v) and the ground (-). I thought I had fried the sensor. I even emailed GasLab support to ask whether I had fried the sensor. They told me it ought to be fine, so I went into my boxes and dug out another arduino nano from ye old 2009. This one worked just fine, but as it lacks wifi it’s unsuitable for my purposes. First emotion: relief that I didn’t fry a $130 sensor. Second emotion: wtf!?!
Well, after attempting 15 different tutorials and SO questions, reading the source code for the SERCOM interface and puzzling over conceptually foreign… concepts, I finally discovered the problem.
The Ardunio was protecting me from myself.

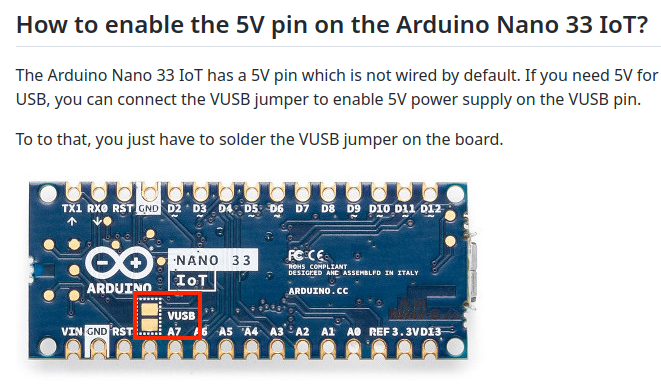
That’s right, the 5v pad isn’t powered by default - a user is required to solder two terminals together in order for electrons to start moving. That sucking sound is my pride leaving this universe.
Reading from Serial on a Nano 33
Three ways to do it. First is the Serial1 interface. These are the rx/tx terminals on the board. Then there’s the SERCOM interfaces that I don’t understand. This example works for one sensor transmitting, moving the sensor tx pin to various rx pins on the Arduino. What I’m not clear on is whether i need to run independent devices on independent SERCOM interfaces. Will need to experiment.

So this example shows that I can move the pin around and get data from three different terminals. Tomorrow, perhaps, I’ll attempt connecting multiple sensors simultaneously and see what breaks.
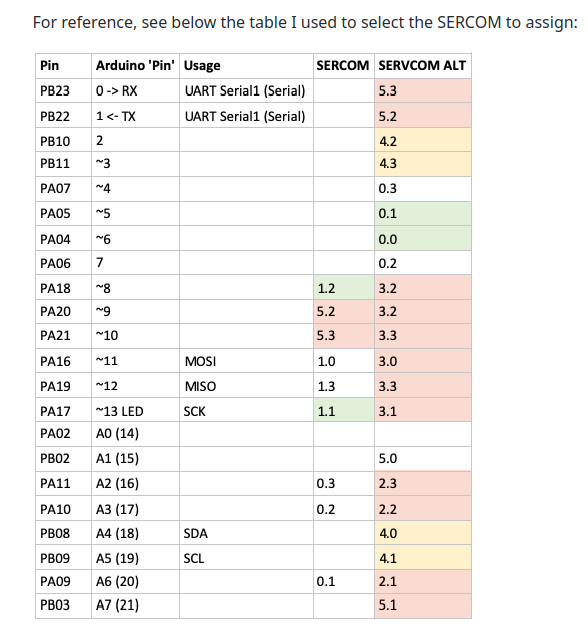
Notice the absolutely unhinged mappings between pins, serial variable names, implied/builtin serial interfaces, sercom pads, an pio_sercom globals. I wanted to put this all in the same example just to highlight all the differences.
    #include <Arduino.h>
    #include "wiring_private.h"

    int RX_PIN = 13;
    int TX_PIN = 8;

    int RX_PIN2 = 5;
    int TX_PIN2 = 6;

    Uart mySerial (&sercom1, RX_PIN, TX_PIN, SERCOM_RX_PAD_1, UART_TX_PAD_2);
    Uart mySerial2 (&sercom0, RX_PIN2, TX_PIN2, SERCOM_RX_PAD_1, UART_TX_PAD_0);

    // Attach the interrupt handler to the SERCOM
    void SERCOM0_Handler()
    {
        mySerial2.IrqHandler();
    }

    void SERCOM1_Handler()
    {
        mySerial.IrqHandler();
    }


    void setup() {
        // Reassign pins 13 and 8 to SERCOM (not alt this time)
        pinPeripheral(RX_PIN, PIO_SERCOM);
        pinPeripheral(TX_PIN, PIO_SERCOM);

        pinPeripheral(RX_PIN2, PIO_SERCOM_ALT);
        pinPeripheral(TX_PIN2, PIO_SERCOM_ALT);


        // Start my new hardware serial
        mySerial.begin(9600);
        mySerial2.begin(9600);
        Serial1.begin(9600);


        // And output Serial
        Serial.begin(9600);
    }

    // the loop function runs over and over again forever
    void loop() {

        // Serial.println("hello");

        if (mySerial.available())  {
            Serial.write(mySerial.read());
        }

        if (mySerial2.available())  {
            Serial.write(mySerial2.read());
        }

        if (Serial1.available())  {
            Serial.write(Serial1.read());
        }
    }
Useless Findings
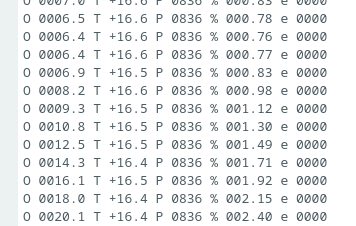
Having got the sensor working, the obvious next step was to play with it. It’s kind of cool. It measures temperature, barometric pressure, and O2 as a percentage as well as partial pressure.
Three findings.
-
The baseline O2% in my office is 20.40%
-
A can of air (diflouroethane) is at least 99% “not air”

-
Diffusion is fast! I sealed the sensor in a bag that I filled with diflouroethane gas and O2 levels climbed very quickly after i removed the straw
-
If I hold my breath and exhale out only when it hurts, that air is 10% O2. I bet I could improve this with practice
What’s Next?
Well, I would like to connect multiple sensors to this thing and get their data into a metrics server somewhere. So I’ll probably do that. I picked up an el-cheapo CO2 sensor off of Amazon. Going to see if that thing is accurate compared the the fancy GasLab desktop meter. I have some humidity and light sensors on order (I think). Also a PM2.5. AND I have a VOC sensor from olden times.
That’ll give me continuous measurement of CO2, O2, pressure, temperature, humidity, PM, flux, and VOCs.
In total it’s four sensors. I’ll probably want to put them in a little box with a fan, install that box in the target environment, and wire the box remotely to the arduino. Or maybe sample air from the environment periodically. Try not to overcomplicate it. Wherever they end up, I’ll sample continuously and run a little push service on the arduino to send datapoints back to my server, where I can scrape and plot using prometheus.
AITRIP SCD40 - https://www.amazon.com/dp/B0BP73KS6G
GasLab OX-0052 - https://gaslab.com/products/oxygen-sensor-luminox-lox-o2
Adafruit Sensirion - https://www.adafruit.com/product/2857
Adafruit PMSA003I - https://www.adafruit.com/product/4632
Adafruit BH1750 - https://www.adafruit.com/product/4681
VOC Sensor - https://www.sparkfun.com/products/17049